-Photoroom")
How to Set Up Facebook Pixel for Better Customer Insights and Tracking
In the world of digital marketing, Facebook Ads are one of the most powerful tools for driving traffic, generating leads, and boosting sales. However, without proper tracking, it’s hard to understand how your ads are performing or if you’re reaching the right audience. That’s where Facebook Pixel come in.
If you’re an eCommerce store owner or business marketer, using Facebook Pixel is crucial for maximizing the effectiveness of your ads. It allows you to track customer actions on your website, measure conversions, and gain valuable insights into how users interact with your store. This information can then be used to refine your ad targeting, improve your ROI, and optimize your campaigns for better results.
In this guide, we’ll walk you through the steps to Set up Facebook Pixel on your website and explain how it can help you improve your customer insights and ad targeting.
What is Facebook Pixel?
Let’s start with the basics. Facebook Pixel is a small piece of code that you place on your website to track visitors and their actions. Think of it as your eyes and ears for your ad campaigns—it captures important data about how people are interacting with your site after clicking on your Facebook or Instagram ads.
Facebook Pixel tracks events such as:
– Page Views: When someone visits your site.
– Add to Cart: When a customer adds a product to their cart.
– Purchases: When a customer completes a purchase.
– Sign-Ups: When a visitor fills out a form or signs up for your newsletter.
By tracking these actions, Facebook Pixel helps you understand which users are most likely to convert and allows you to optimize your ad campaigns accordingly.
Why Is Facebook Pixel Important for Your Business?
As a business owner, Facebook Pixel can be a game-changer for your advertising strategy. Here are some key reasons why you should set it up:
- Better Tracking of Conversions: Facebook Pixel lets you track customer actions and measure whether your ads are leading to desired outcomes (e.g., purchases, sign-ups, etc.).
- Improved Ad Targeting: With more accurate tracking data, Facebook can optimize your ad delivery to reach the right people at the right time.
- Cost-Effective Campaigns: By tracking user behavior, Facebook Pixel ensures that your ads are shown to the people most likely to convert, helping you get the most out of your ad budget.
- Audience Retargeting: Pixel helps you retarget visitors who didn’t complete a purchase, encouraging them to return and finalize their action.
In short, Facebook Pixel is essential for tracking the success of your campaigns and ensuring that your ads are being shown to the right people.
Step-by-Step Guide to Setting Up Facebook Pixel
Now that we know why Facebook Pixel is important, let’s walk through how to set it up on your website.
1. Create a Facebook Pixel
The first step is to create your Facebook Pixel in your Facebook Business Manager. Here’s how:
- Log in to Facebook Business Manager: Go to [business.facebook.com](https://business.facebook.com/) and log in with your credentials.
- Navigate to Events Manager: In the left-hand menu, click on “Events Manager.”
- Click Pixels: Under the “Data Sources” tab, click on “Pixels.”
- Create a Pixel: Click the green “ Add ” button to create a new Pixel. Give your Pixel a name (e.g., “My Store Pixel”) and click “Continue.”
- Copy the Pixel ID: After creating your Pixel, you’ll be given a Pixel ID. This is the unique identifier for your Pixel, which you’ll use in the next steps.
2. Install the Facebook Pixel on Your Website
Once you have your Pixel ID, it’s time to install it on your website. The method you use will depend on how your website is built (e.g., Shopify, WordPress, or a custom website). Here’s a general guide:
Method 1: For Shopify Users
If you’re using Shopify, Facebook Pixel integration is simple. Shopify has a built-in integration feature that automatically adds the Pixel code for you.
- Go to your Shopify Admin panel.
- Navigate to Online Store >Preferences.
- Scroll down to the Facebook Pixel section.
- Paste your Pixel ID into the field and click “ Save.”
Method 2: For WordPress Users (with a Plugin)
If you’re using WordPress, you can use a plugin like PixelYourSite or add the code manually.
- Install and activate the PixelYourSite plugin from the WordPress dashboard.
- Go to the plugin settings and paste your Pixel ID.
- Save the settings, and your Pixel will be active on your site
Method 3: Manual Installation for Custom Websites
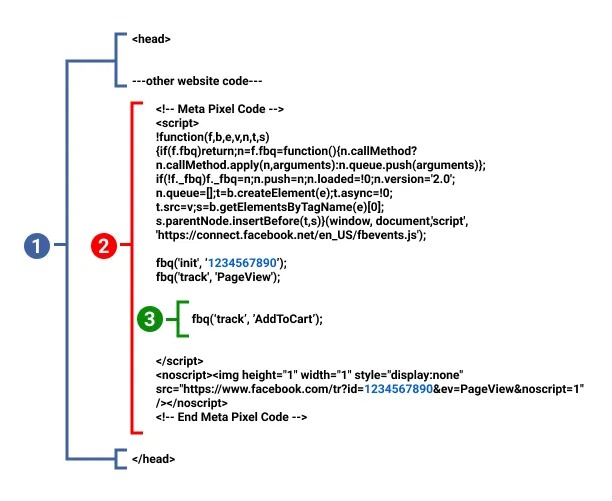
If you’re working with a custom-built website, you’ll need to add the Pixel code manually to your website’s header.
- Copy the Pixel code from Facebook’s Event Manager.
- Open the header.php file of your website (or ask your web developer to do this for you).
- Paste the Pixel code just before the closing `</head>` tag.
- Save the changes, and the Pixel will start tracking user actions.
3. Test the Pixel Installation
After setting up the Facebook Pixel, it’s important to test whether it’s working correctly. Here’s how:
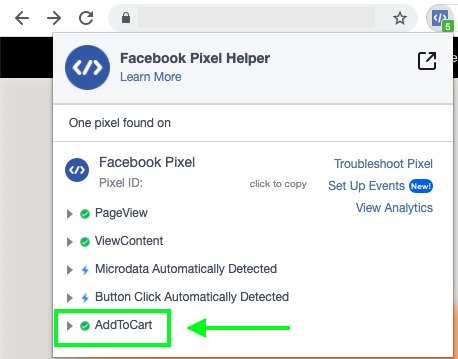
- Install the Facebook Pixel Helper: This is a Chrome extension that helps you verify whether your Pixel is installed correctly.
- Visit Your Website: Go to your website and open the Pixel Helper in your browser.
- Check for Pixel Activity: If the Pixel is installed correctly, the Pixel Helper will show a green checkmark, indicating that it’s firing and tracking events.
4. Set Up Standard and Custom Events
Once your Pixel is installed, you can begin tracking specific user actions (events) on your website. Standard Events include actions like Add to Cart, Purchase, Page Views , and more.
Here’s how to set up events:
- Go to Events Manager: In Facebook Business Manager, navigate to Events Manager.
- Select Your Pixel: Choose the Pixel you’ve created for your website.
- Add Events: Click on the “Add Events” button and choose which actions you want to track (e.g., product views, purchases, etc.).
- Use the Pixel Event Setup Tool: For most common events, Facebook offers an easy-to-use event setup tool where you can choose the action you want to track without writing any code.
For advanced tracking, you can create **Custom Events** to track specific user interactions that are important to your business.
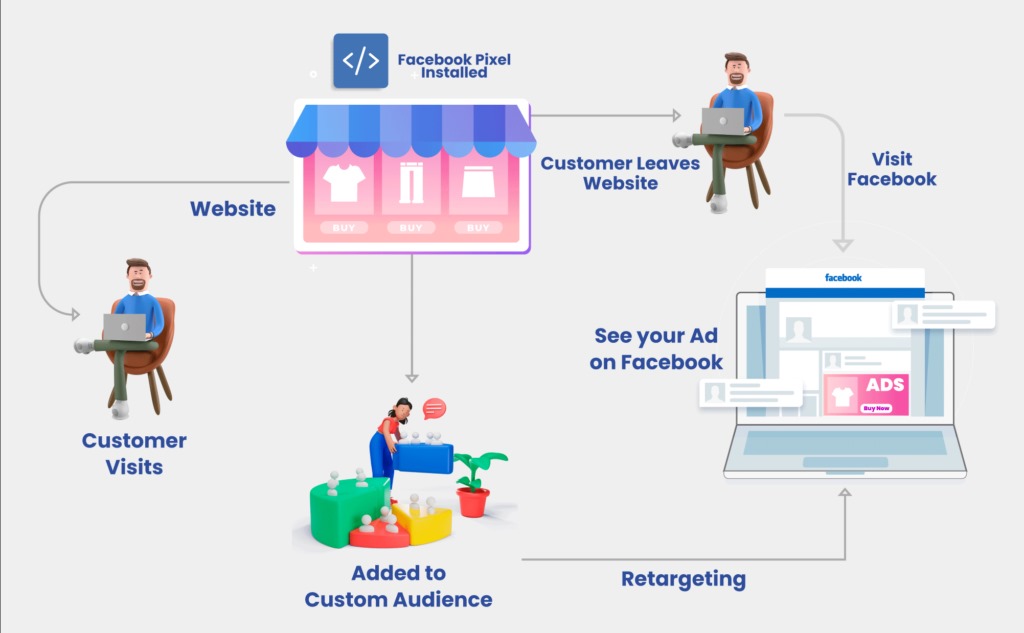
5. Use Facebook Pixel for Retargeting
Now that you have Facebook Pixel tracking your users, it’s time to set up retargeting campaigns. This allows you to show ads to people who’ve visited your site but didn’t make a purchase.
Here’s how:
- Create a Custom Audience: In Facebook Ads Manager, go to Audiences and click “Create Audience.”
- Select Website Traffic: Choose the option to create an audience based on people who have visited your website.
- Define the Audience: Set up rules for your audience, such as users who visited a specific product page but didn’t purchase.
- Run Retargeting Ads: Once your audience is set up, you can create Facebook Ads that specifically target these users, encouraging them to return and complete their purchase.
How Facebook Pixel Improves Customer Insights
Facebook Pixel is more than just a tool for tracking conversions—it’s an analytics powerhouse that provides valuable insights into your customers’ behavior:
– Who is visiting your site: Pixel helps you understand the demographics, interests, and behaviors of your website visitors, helping you create better-targeted ads.
– Where customers drop off: Pixel shows you which parts of the sales funnel users drop off, allowing you to make data-driven adjustments (like optimizing your checkout process).
– How to personalize ad: With accurate customer data, you can create highly relevant, personalized ads that resonate with your audience and increase the likelihood of conversions.
Conclusion: Maximize Your Facebook Ads Performance with Pixel
Setting up Facebook Pixel on your website is one of the most effective ways to track customer behavior, optimize your ad campaigns, and improve your ROI. By accurately tracking customer actions and refining your ad targeting, you can create more cost-effective campaigns and drive better results for your business.
Whether you’re new to Facebook advertising or looking to improve your existing campaigns, Facebook Pixel provides the insights and tracking you need to succeed. If you’re ready to take your Facebook Ads to the next level, setting up Facebook Pixel is the first step towards making smarter, data-driven marketing decisions.
At TagGenAI, we specialize in helping businesses like yours implement and optimize Facebook Pixel for better tracking and insights. If you need assistance with setting up your Pixel or improving your ad performance, reach out to us today!


-Photoroom")